The original pillowcase with unusual "architectural" folds will look good, even if you sew it from a simple fabric.


The task for those who love the "architectural" cut: a pillowcase with curly folds for a decorative pillow. It will look good, even if you sew it from a simple fabric. It is better to take the material without a drawing: it is precisely the complex folds that play the main decorative role. This pillowcase is made for a pillow measuring 50x50 cm.

Life hack: how to sew a perfectly fitting pillowcase on a pillow
You will need:
- fabric (suitable linen, cotton, other fabric without a pronounced texture);
- ruler;
- a chalk or disappearing marker for tissue;
- scissors;
- pins;
- sewing machine and thread.
Pillowcases for decorative pillows - do it yourself: 7 workshops
Step 1
Cut out 4 identical squares of 35x35 cm from the fabric.
Step 2

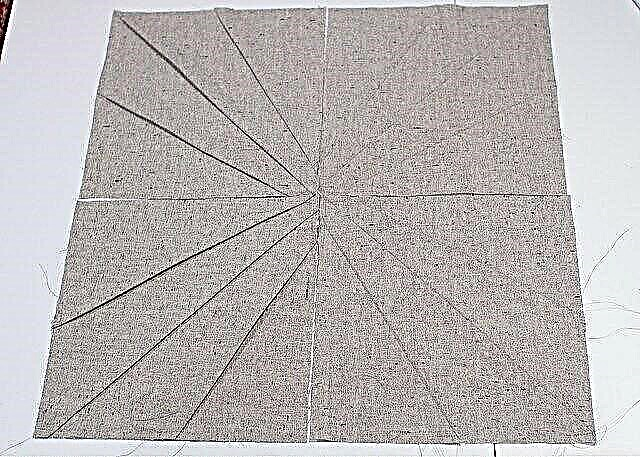
Mark the squares with a chalk or disappearing marker according to the scheme:
- From the lower left corner measure 1.3 cm to the right, put a mark.
- From the upper right corner, measure 1.3 cm down, put a mark.
- Connect these marks with a line.
- Draw a parallel line at a distance of 2.5 cm from the drawn line.
- Repeat the steps, measuring 15.2 cm to the left of the second line that you drew, and the same down from the first line you drew. You should get a picture of 6 lines (see photo). Put the arrows on which you will lay the folds, so as not to get confused.
So draw all 4 squares.
Step 3

Fold and iron the folds according to the marked arrows. Chip the folds with pins and trim the edges with scissors. Do it on all 4 squares.
Step 4
Fold the squares so that the lines converge in the center, and all the folds look in one direction (in a circle).
Step 5


Sew 2 squares first, then combine them into a single fabric. Iron the seams.
Step 6

It remains to complete the back of the pillowcase and sew it from the front. Cut out 2 rectangles, focusing on the finished front of the pillowcase: the rectangles should form an overlap. Work on the edges that are in the middle.
Step 7

Fold the design with the sides inward: the front of the pillowcase and two rectangles with an overlap on the back of the pillowcase. Chip with pins. Sew around the perimeter, if necessary - work the edges in a zigzag, twist and iron the pillowcase. Done!

Photo and source: skirtastop.com