To determine your size, you need to know the basic parameters of the figure, correctly take measurements and compare them with the data in the Burda tables.


How to take measurements
Take measurements while in underwear.
Tie the waist with, for example, rep ribbon or a regular narrow elastic band.
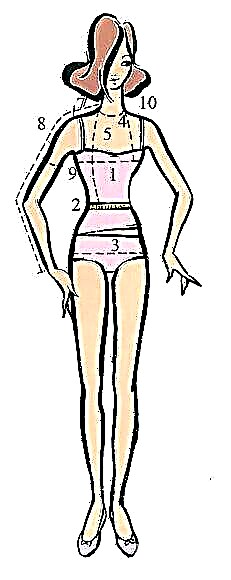
- Chest circumference: measured at the most prominent points of the chest.
- Waist circumference: on the tape at the waist (pulling a centimeter tape).
- Hip girth: on the most prominent points of the buttocks.
- Chest height: from the highest point of the shoulder (at the base of the neck) to the most prominent point of the chest.
- Front Length to Waist: from the highest point of the shoulder through the most prominent point of the chest to the lower edge of the tape at the waist.
- Back length: from the seventh cervical vertebra to the lower edge of the tape at the waist.
- Shoulder length: from the base of the neck to the joint of the arm with the shoulder.
- The length of the sleeve: with a slightly bent arm from the articulation of the arm with the shoulder through the elbow to the wrist.
- Girth of the upper arm: on the widest part of the arm.
- Neck circumference: at the base of the neck.
- Height measure from crown to toe.
- Skirt length from the bottom of the tape at the waist to the desired level.
Advice
- Ask someone close to help you take your measurements. The results will be more accurate.
- Do not take into account the size of the finished product purchased at the store.As a rule, this size does not match the size of Burda. Take your measurements!
What measurements should be taken to determine the size of the trousers
- Waist circumference: measured by tape tightly stretched at the waist.
- Hip girth: on the most prominent points of the buttocks.
- Pants length on the side (on the side seam): from the bottom of the tape at the waist to the desired level.
- Length on a step (step seam): on the inside of the leg from the groin to the desired level.
- Hip circumference: on the widest part of the leg.
- Seat height: measured while sitting with a straight back from the lower edge of the tape at the waist to the fulcrum.
Please note that the hip circumference, in addition to the allowance for freedom of fit (approximately 4 cm), may also include an individual allowance for this model.
Seat depth also depends on the model.
Very narrow trousers should fit the figure in the area of step seams, while wide trousers with pleats or trousers for sports should be more loose.

How to determine your size
Enter your sizes in your own table and compare them with the table data.
Determine the size closest to your measurements.
If necessary, make changes to the finished pattern according to your individual measurements, which differ from the Burda table sizes.
Women's Size Comparison Chart Burda

Burda size chart 32 to 60

1 - Growth
2 - Chest
3 - Waist
4 - Hips
5 - Back length
6 - Sleeve length
7 - Neck circumference
8 - Length of trousers along the side seam
9 - Front Length
10 - chest height
11 - Girth of the upper arm
Basic rules for determining the size of the pattern
For dresses, blouses, coats and jackets, the main measure for determining the size of the pattern is Chest circumference.
For trousers and skirts, the main measure for determining the size of the pattern is Hip girth.
Each pattern has several sizes.
The dimension lines are located close to each other, which allows you to easily make appropriate adjustments to the pattern.


