From felt you can sew animals and a “garden” with “vegetables”, make finger puppets, play tic-tac-toe, and you can even draw with felt! Ideas for games and toys from felt are in our selection.
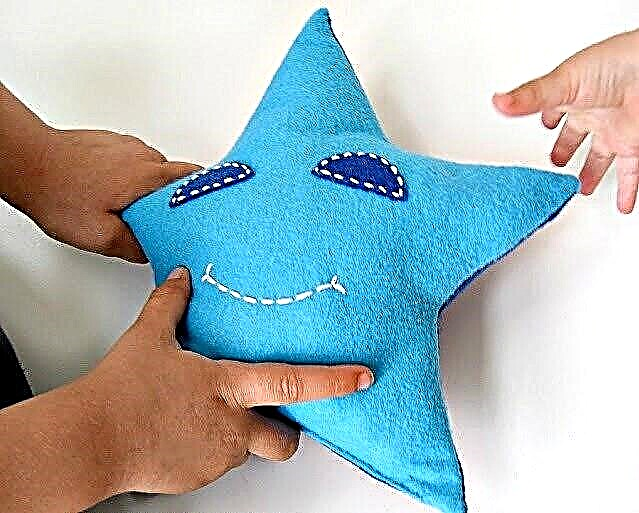
1. Felt toy star
How to sew toys according to children's drawings: 3 master classes
You will need:
- felt of two colors;
- scissors;
- synthetic winterizer;
- chopstick for eversion and stuffing (a wooden chopstick is suitable);
- threads and a needle.
Funny DIY Sock Toys
Step 1


Cut two identical details in the form of stars from felt of two colors.
Step 2

Also cut 2 circles and cut each in half.
Step 3

Sew the halves of the circles to the details in the form of stars - these will be the eyes.
Step 4

Fold the details of the stars with their faces inward and sew, leaving a hole for turning out.
Step 5


Turn out the toy, helping yourself with a stick, and fill it with a padding polyester. Then sew the hole. Done!
P. S. By the same principle, you can sew toys of a different shape - for example, in the form of a flower, a triangle and so on.
Photo and source: applegreencottage.com
DIY felt tablet case: workshop
2. Bears from felt: a master class


You will need:
- felt 2-3 colors (for the toy itself, for details, for the nose of the bear) - also these toys are well sewn from fleece;
- buttons for the eyes, you can take special eyes for toys, they are sold in needlework stores, or embroider eyes with thread);
- scissors;
- synthetic winterizer for stuffing;
- sewing machine and thread;
- black threads for embroidery and a needle.
Step 1

From felt, cut out 2 identical parts of the toy. On one of them, outline the eyes with dots.
Step 2


Cut out additional details from felt of a different color (muzzle, nose, and so on). You can first cut parts from paper, attach them to the workpiece and adjust the shape and size, and then cut from felt. Choose or invent your bear!
Step 3

Sew the muzzle detail to one of the main parts of the toy and embroider the nose on it, as shown in the diagram. Also sew / attach / embroider the eyes.
Step 4

Fold the two main parts with the sides inward and sew together, leaving a hole for turning out.
Step 5

Turn out the toy, stuff it with a padding polyester and sew a hole in a hidden seam.
P. S. By the same principle, you can sew other characters.
Photo and source: shinyhappyworld.com
All about teddy bears: history, features, master classes
3. Board for "drawing" felt: a master class

The essence of this toy is that felt holds well on felt. That is, having pulled a felt board over, it will be possible to “draw” on it figures cut out of felt, or arrange a “felt puppet theater”.
You will need:
- plywood or thick cardboard;
- a large sheet of felt and several sheets of different colors for the figures;
- optionally - a frame into which the board will be inserted;
- scissors;
- glue or stapler with staples and adhesive tape for attaching felt to the base.
Step 1

Stretch the base with felt - glue it to glue or fasten with paper clips, bending the ends to the wrong side of the base. On the reverse side, you can fix it with tape. If desired, insert a felt-covered base into the frame.
Step 2

From multi-colored felt, cut out parts of different shapes. Done - you can play!
Photo and source: funathomewithkids.com
We sew soft toys - a cat and a dog
4. "Tic-tac-toe" of felt: a master class

You will need:
- felt of two colors;
- scissors;
- tape for ties;
- sewing machine and thread.
Step 1

Cut a square from felt of one color and a slightly larger square from felt of another color. Fold them one on top of another, outline the grid and sew several times, while stitching the squares and marking the playing field. Sew a tie strap to the middle of one side.
Step 2
Cut out of felt, contrasting in color to the upper square, “crosses” and “zeroes”. Done.
Photo and source: oleanderandpalm.com
5. Felt dolls made of felt


You will need:
- felt of different colors;
- scissors;
- needle and thread;
- glue;
- synthetic winterizer.
Step 1

Use patterns or create your own characters.
Step 2

Cut out the main details - 2 identical for each toy - and sew.
Step 3

Cut out additional details in accordance with the pattern you have chosen. To make the head of the toy voluminous, it can be sewn from two parts and stuffed with synthetic winterizer. Assemble toys from the parts by gluing or sewing elements on the base.
Photo and source: onecreativemommy.com, pinterest.com
6. "Garden" with vegetables and felt strawberries: a master class


You will need:
- felt of different colors;
- brown knitwear for "beds";
- cardboard box;
- brown paint (gouache, acrylic) and a sponge or brush;
- synthetic winterizer for stuffing;
- Velcro tape;
- wire;
- hand needle, sewing machine and thread.
Step 1

First we make the "beds". Paint the box brown and let dry. Sew cylinders from several rectangular pieces of knitwear and stuff with padding polyester, sew the ends. Put the cylinders in the box.
Step 2


To make carrots, cut out triangular blanks from felt of orange and sew to make cones. Cut circles from orange felt to the size of the cones. Cut green leaves of green leaves. Sew the tops to the circles, fill the cones with a synthetic winterizer and sew on top of the circles.
Step 3


To make a radish, cut a circle from pink felt and cut out pieces of it, as shown in the photo. Sew on the machine, forming a toy, twist, stuff it with a padding polyester and sew a hole. Cut a leaf from green felt, and a piece of vein from pink, stitch the pink part to the green, forming a narrow pocket. You can insert wire into it. Then sew the leaves on the radish.
Step 4


Strawberry bushes are one of the most difficult elements, but the efforts are worth it: the berries can be picked and returned to their place, since Velcro is sewn to their “tops”. Berries are made of red felt, packed and decorated with embroidered seeds. Then - a leaf on top, to which "Velcro" is sewn. The stalks are made of wire to which felt curly leaves are sewn.
Photo and source: abeautifulmess.com
Preview photo: shinyhappyworld.com